Someone asked me if I had written the pattern for the Minecraft Steve Doll I had made and posted in a previous post. It’s been a crazy busy year and I got side tracked. I had every intention to get this out a lot sooner but you know what they say about good intentions and all :-).
As I’ve mentioned before, I can read patterns and am passable at writing them (which is why it’s taken me so long to get this out). I had hoped to make another doll and force myself to write down what I did as I went but I just haven’t had the time to make one. So I’ve started a new one recently and my goal was to finish the doll with the changes I wanted to make to the last doll and post the pattern the last two Fridays. The first Friday, I realized there was no way I was going to finish the doll and it’s pattern by my deadline. Instead, I thought I could give a tutorial on what I did so that people could make it from that and I would still have a post for Freebie Friday and I would finish the doll by the following Friday and I would have an actual pattern.
Wellllll….it didn’t quite happen that way. I jumped into the tutorial by pulling out my photos of the doll and panels used to make it as well as graphs I colored to help me plan the project. I dove in and discovered there was just NO way I was going to get that done for that Friday’s post. I guess I should mention that I started the whole endeavor between my shift from work on Friday morning. I had a whole three hours to get it done before I had to go back to work. I knew I wasn’t going to get it finished when I got home because there was dinner to make and then the inevitable collapse from exhaustion (I work with kids!). But I managed to lie to myself that I would finish it before midnight and it would still be Friday.
It didn’t happen.
So I rationalized that it wouldn’t be the end of the world if I skipped a Friday but I was definitely going to get something out for next Friday. I had all of the weekend and the entire week to finish. I dove in again and was having trouble organizing my process to make it as simple as possible to follow. Friday caught up with me real quick and I was once again in my three hour break between shifts on Friday morning knowing there was NO possible way I was going to get that tutorial out (Deja Vu!).
I shifted gears and opted to write about the scarf I made for my niece because I could definitely get that done before I went back to work. I just barely made it but I had something to post. I’m still thinking about the best way to get something useful out on making the doll until I have a pattern ready. Or even better, I’m hoping to shoot a video of me actually making the doll. I’ve been wanting to do that for awhile. I have my fingers crossed. 🙂
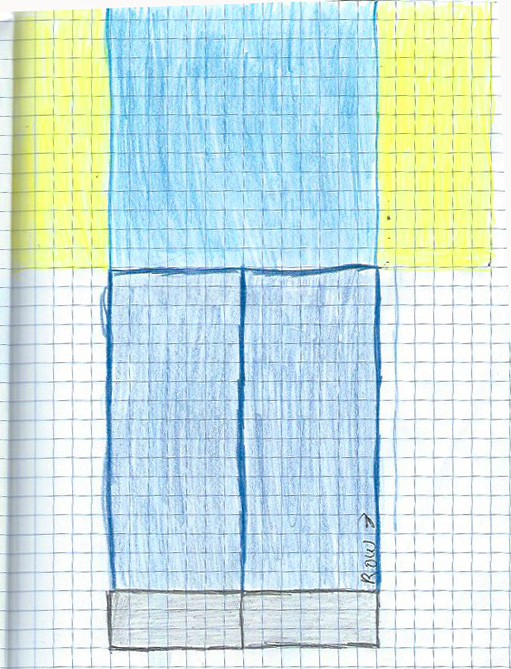
But for now, perhaps this will help someone make the doll. These are my sketches on graph paper that helped me map out how I wanted the doll to look. It matches that second doll I made. Each square is a single crochet. Disregard the different colors used. The skin tone should be a tan color and not the yellow I used for some of them.
The head, the arms, the body, and the legs were all done in separate panels. Edges were created using front post single crochet or back post single crochet. I used whichever stitch I needed to get all the edges on the same side.

This shows the front view of the doll. The head was crocheted horizontally while the rest of the doll was done vertically. The arrow shows the direction I was crocheting.
This one focusses on the front panels of the legs.

This shows the width of the doll from the side. The arms are slightly smaller than the body.

The top of the left one (lighter blue) shows how many single crochets per row are on the side of the body. The bottom right (darker blue and grey) shows the side of the leg.
For a reminder of what the panels looked like, check out my previous post on Jan. 13 of last year (has it really been a year already?!) You can also see the finished doll on that post.

http://(https//yochet.wordpress.com/2015/01/13/second-crocheted-minecraft-steve-doll/
You may want to fix you link.
LikeLike
I’ll get on it right away. Thanks
LikeLiked by 1 person
YESSSSSS Awesome. My friends’ daughter asked me if I could make her a crochet enderdragon LOL 😀
LikeLiked by 1 person
That would be awesome. I would love to see how that turns out. 😊
LikeLiked by 1 person