Initially I had planned to do separate posts about my progress on the second course of the Craft Yarn Council’s Teacher Certification program. Time got away from me, though, what with going back to work and being crazy busy with getting back in the swing of things. We’ve been back a full week now and I had a breakthrough moment with one of my 4th grade girls and single crochet, but I digress, that will be for another post.
Back to my swatching.
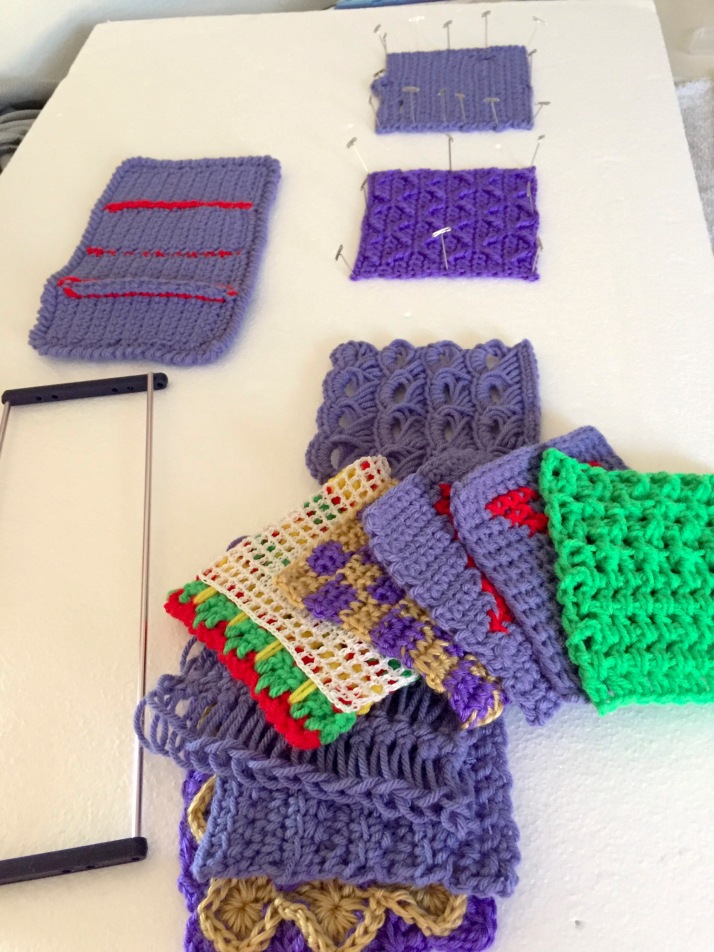
Swatches everywhere!
I have completed most of the required swatches for the program and have left the required lesson plans and the sweater for last. The sweater will be considered the final exam. I won’t go into the gory details of each swatch, only the more interesting ones but I will say that I made each swatch at least 3 times trying to make them perfect. Some required a lot of undoing and redoing to get the right gauge, but in the end, I was happy with the results.
The Flame Stitch

No yarn tails in sight!
This one was the hardest in the sense that I found the directions confusing. It took me a few days and some research just to figure out what they wanted. I’m not sure if I did this one right but I’m pretty sure. Someone (Jo) commented on one of my previous posts that a newsletter with pictures was sent out with corrections! What the what!? I didn’t get any such letter. She said it looked like they allowed floats along the sides. Before I read that comment, I debated about whether I should carry the yarn on the side but since they didn’t ask for a border, I decided to weave in the million ends I had when I was done. Add to it that the red rows were very thin, making it that much harder to weave in the ends neatly but I think I nailed that part.
The Mesh Square with Filet Pattern

Can you see the boat?
Doing the stitch on this one wasn’t hard. What was hard was using thread yarn and my teeny, tiny steel hooks. I have a set of steel hooks that I have never used. I’ve had them for a long time. Not sure if I bought them or if I got them from my mom but I’ve had them awhile. I have them just in case there is a crochet emergency where I have to, just have to, make a doily or something. Luckily, I’ve never had such an emergency, until now. Now I had to make a swatch using #10 cotton thread yarn and a steel hook. I hated it. I had to pull out my good reading glasses and learn how to get the right gauge using that slippery yarn. My tension was off too. I changed to smaller and smaller hooks to get the right tension. Then I had to work and rework the square to get it centered right. In the end, I just left more mesh on top than on the bottom. At least it was centered from side to side. The example in the manual has one mesh row on the bottom and two on top so that’s not centered either but mine has two on the bottom and I had to add four on top to make it 5 inches but I just left it for now. I might redo that one later but it’ll do for now.
I’m glad I was forced to use my steel hooks and thread-yarn because I’ve been wanting to make tiny dolls and now I’m more comfortable giving it a try. I’ve never used thread to make dolls so it should be interesting. 🙂
Hairpin Lace and Broomstick Lace
I had never tried hairpin or broomstick lace and was a little nervous about it. I didn’t have the required tools for these stitches and I wasn’t sure I wanted to invest money into said tools just to make swatches. However, if it was a technique I liked, it couldn’t hurt to own them. I went ahead and bought the loom for the hairpin lace. I was slightly disappointed with how flimsy it seemed and it was the best one I could find! It got me thinking I could probably make a better one myself. We’ll see…
I studied videos and read tutorials and wasn’t feeling it. It didn’t seem like something I would enjoy doing. Once I got into actually trying it, it was a lot of fun. After I finished my swatches, I had to figure out how to join them. I went with the woven method and even wove the sides. The directions didn’t mention the sides but they looked messy to me and so I wove those too.
I like hairpin lace!
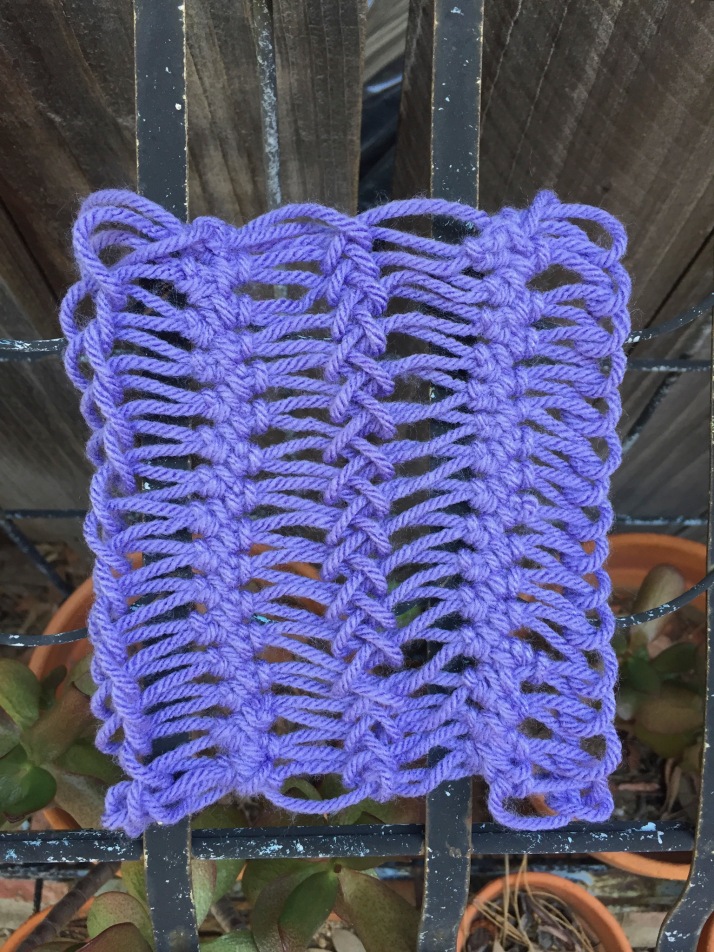
The broomstick lace called for a very large broomstick pin or knitting needle. I didn’t want to buy one just yet so I went in search of a real broomstick. Believe it or not, I ended up using a toy lightsaber that was laying around. Yes, we have lightsabers just laying around. My hubby and 17 year-old son (and his cousins) still have battles.

Doggy is so nosy, I just had to leave her in the shot.
I looked ridiculous with a three foot lightsaber on my lap working the broomstick lace but it got the job done!

I liked this more than I thought I would.
Now that I know how easy and fun it is, I will probably make my own broomstick (you didn’t think I would actually go buy something, did you? 🙂
Intarsia
I had a love hate thing going on with intarsia crochet. I’ve tried this before and got frustrated with it and gave it up. But here it was again rearing it’s ugly head. I HAD to learn it now. This one took me many tries before I figured out how to move the yarn around so it would look good on both sides. I think I finally got it.

Intarsia
I’m glad I had to do this method because it was one of those things I always wanted to master but never felt a strong enough need to actually do it.
Tunisian Swatch with Cross Stitch
I want to go into more detail about this one so I will do a separate post about this swatch and the shenanigans that ensued.
Overall Thoughts
Going through the course has made me pretty expert at gauge and blocking. These were things I never worried about before but I’m so very glad I have these skills now. I’m also glad I was forced to try stitches and techniques that were new to me because knowledge is power and I want to be a powerful crocheter. And some of these stitches were just plain fun.
Now on to the final baby sweater and lesson plans. Charge!!!

Wow. I’m not even going to ask about “intarsia crochet.” It sounds as nightmarish as Intarsia knitting. I’m glad you’re learning something from doing this. If I did something like this and didn’t learn much I’d be furious!
LikeLiked by 1 person
Right?! It was trial and error for sure. But the upside was the learning 🙂
LikeLiked by 1 person
You are making me want to learn all of these different stitches. All of your swatches look great!
LikeLiked by 1 person
Thank you 😊 I’m glad it’s forcing me to try new things.
LikeLiked by 1 person
I love, love, LOVE the broomstick swatch! I just might have to go and find myself a broomstick/lightsaber to have a go!
LikeLiked by 1 person
I’m actually thinking of purchasing a shorter light saber for my permanent broomstick lace needs. Lol But I also have my eyes open for anything else that might work. Doing that stitch with something unconventional makes it so much more fun for me.
LikeLike
These are beautiful, and it’s cool that you’re doing this certification. I love crochet but I’ve never had the patience to take it to this level. The broomstick lace is especially fun. 🙂
LikeLiked by 1 person
Thank you! That’s what I love about crochet, you only have to take it as far you want. I’m thinking broomstick lace is going to become a permanent part of crochet bag of tricks. 🙂 It’s so easy to do!
LikeLiked by 1 person
I love the way that broomstick looks but I had a very fiddly time doing it. That was before I conquered hairpin lace though so I may try it again since now I’m comfortable with adding a device to balance and try to hold onto while crocheting. I ended up buying a pair of the really big big plastic knitting needles and gave one to a friend that also crochets. I love using the woven method for joining the hairpin strips. That’s what I’m going to use for my “un-striping self striping yarn” experiment project. When you use it to join strips together it makes a lovely braided/cabled look. I started a sweater last year using this and I have no idea why I didn’t finish it. The strips are all made and most of the body has been joined. I just need to add the sleeves and join a few more strips. I am very intrigued by the Intarsia!! What is this!!! A crochet technique that I haven’t heard of yet??? I will be researching this. 😀
LikeLiked by 1 person
You probably already knew what it was but didn’t know it was called intarsia. At least that’s how it was for me. The course had fair isle crochet, tapestry crochet and intarsia in the same section. I didn’t know what any of those were until I saw the directions. I was all, “Oh, it’s just the different ways to carry the yarn when you do color work. ” One lets you float the yarn behind the work, you carry the yarn in the other, and with intarsia, you have a bunch of hanging bobbins in the colors you need for different sections, even if it’s the same color. It’s all about how the color is broken up. That’s what gave me the hardest time, figuring out when I needed a new bobbin versus bringing up the yarn from the last row. If you don’t do it right, you end up with a long float. You also have to remember to bring your yarn bobbins from the back to the front on some rows so that you have them on the correct side when you need them! That’s why I abandoned complicated intarsia color work in the past. Even the little swatch gave me a headache,but once I was done, I got good at it. Still, I don’t think I’ll be trying any larger projects anytime soon!
LikeLiked by 1 person
And I hope you finish the hairpin lace top. I want to see it!
LikeLike
Oh I’ve done some stuff like that. I like the fancy names though!! 😀
LikeLiked by 1 person
Too fancy for me! I didn’t even bother remembering what they were. I just kept thinking, how does Fair Isle mean letting the yarn hang in the back until you need it again? Or was that Tapestry? LOL Ok, I’m not that bad. I know them now but I did keep looking back while I was doing them to remind myself which one was the hanging one, the one I hid and the one that didn’t do either.
LikeLiked by 1 person
Super cool !! Makes me want to try too! The hairpin lac is very pretty ❤️
LikeLiked by 1 person
Thank you. 😀 You should give it a try!
LikeLike
Your broomstick stitches look really great! Are you planning on making something with those swatches or do the people who examine you keep them?
LikeLiked by 1 person
Thanks Emma. 🙂 I submit them and then they send them back. I have all my work back from level 1. You pose an interesting question about what I’m going to do with all those swatches. I’m not sure yet. Two rejects that didn’t make the cut were turned into a purse and a phone case. Maybe I’ll turn them into a sampler. Then I can use them as examples if I ever end up teaching professionally.
LikeLiked by 1 person
That sounds like a great plan! I think it would totally help to be able to see the stitches and feel them before trying to replicate them 🙂
LikeLiked by 1 person
All the swatches look great, Yolanda 😊 I love the broomstick stitch…when I tried it the first time I used my 2′ long wooden spoon 😂 But a lighsaber is so much cooler…maybe take it to a park bench 😉 Learning new stitches is so much fun! But I think I’ll pass on the thread and skinny hook 😬
Oh…completely unrelated – did you send me your address yet? I just looked through my emails… I can’t find it 😕
LikeLiked by 1 person
Thanks Tina. I can just see myself at the park doing the broomstick lace stitch at the park with my giant light saber. The looks I’d get! 😂
I sent the address awhile back but I’ll send again. Maybe it went into the spam folder.
LikeLiked by 1 person
Hehe 😂You’d probably make the paper 😋
LikeLiked by 1 person
I saw the boat! Crocheting with thread is hard and long, but so worth the beautiful things you can make. Love the broomstick swatch, just beautiful!
LikeLiked by 1 person
Thank you. 😊 I really like the broomstick lace. I’ll go ahead and invest in a permanent tool other than a light saber. Lol
LikeLiked by 1 person
May the force be with you
LikeLiked by 1 person